Deltek
Use Deltek
Deltek is the comprehensive business management software platform that our agency uses. Deltek is designed specifically for project-based organizations like ours. The platform helps track employee time, process purchase orders, manage leave requests, monitor project budgets, and handle other administrative tasks. The platform centralizes these functions in one system, making it easier for team members to access information and view operations across multiple projects.
Deltek only works on the Microsoft Edge browser: deltek.mapc.org/visionclient
Related links
- How to submit a timesheet
- How to submit a hybrid work agreement
- How to check your leave time and accruals usage
- How to request a vacation day
- How to submit a purchase order
- How to submit a progress report
- How to run a report in Deltek
Submit a Progress Report In Deltek
Purpose of Monthly Progress Reports
Monthly progress reports are used to inform the client of the work completed during the reporting period. These reports are attached to client invoices as documentation of progress and proof of work performed. It is essential that progress reports are submitted and approved in a timely manner (by the first Thursday of every month) so the Finance team can review, process, and attach them to invoices each month. Delays in submitting reports may delay client invoicing.
Best Practices for Completing Progress Reports
-
Always paste content as plain text; instructions are provided below.
-
Use complete sentences and avoid personal pronouns or personal names.
-
Be detailed and proportional to the amount of work completed and dollars spent.
-
State whether each activity is complete or ongoing.
-
If an objective from last month wasn’t met, briefly explain why.
-
If no activity occurred, write: “As expected, no activity this month.”
-
List all products with their status (draft, final, revised). If none, write “None.”
-
For meetings, include the date, participants by affiliation or title, purpose, and location (if outside the State Transportation Building). If none, write “None.”
-
Use infinitive phrases for next month’s objectives (e.g., To finalize…, To continue developing…).
-
Spell out acronyms on first use unless commonly known (MassDOT, MBTA).
-
Avoid uncommon abbreviations.
Instructions for Completing Monthly Progress Reports in Deltek
- Log in to Deltek Vision – Open Microsoft Edge and go to https://deltek.mapc.org/visionclient/
- Enter your username and password
- From the Navigation Menu, click on Info Center, then select CTPS Public Project Names.
- To navigate to your active projects, click the folder icon in the top-right corner next to the Search box. Under Global Searches, choose “My Active Projects”. This will display all Active projects where you are listed as Project Manager or Additional Project Manager. You may also search by project number or by typing any portion of the project name in the search bar.
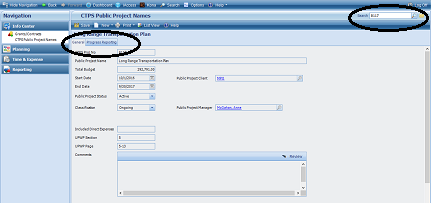
5. After selecting a project, go to the Progress Reporting Tab.
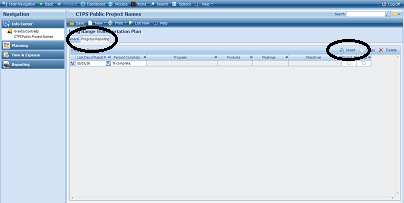
6. To insert your progress report information, click Insert in the top right corner of the grid.
7. To enter text in the Progress, Products, Meetings, and Objectives for Next Month fields, use the pop-up text editor. Click inside the cell. A pencil icon will appear on the right. Click it to open the editor.
8. In the text editor, you must use plain text only (text without any formatting). If you are pasting content, use the “paste as plain text” button (notepad icon with letter “A”).
9. All columns must contain a value except for those with checkboxes. If you have no text to add yet, open each required text field and enter at least one character (a single space works). Without this, the system will not allow you to save.
10. When your entry is final, check the box “Project Mgr has completed report.”
11. Supervisors must review each project report on their team and check “Group Mgr has approved report” when the content is satisfactory.
If you have any questions, please contact a member of the Finance team at [email protected].
Submit a Prior Approval Request for Travel
- Start a new Prior Approvals for Travel form
a. Log in to Deltek Vision.
b. From the Navigation Bar, go to CTPS Forms, select CTPS Prior Approvals for Travel, and click New. - Enter initial information
a. Complete the highlighted fields and click Save. This will autopopulate some sections.

- Complete the remaining form.
a. Airfare: Obtain multiple quotes from sites such as Kayak or Expedia and enter the selected fare into the form. Save the quotes as a PDF on your desktop.
b. Hotel: Obtain three quotes, including the government rate if available. Enter all options in the grid, then check the box in the Select column for your preferred hotel. Only one hotel should be selected.
c. Complete any remaining fields and click Save again. - Upload attachments.
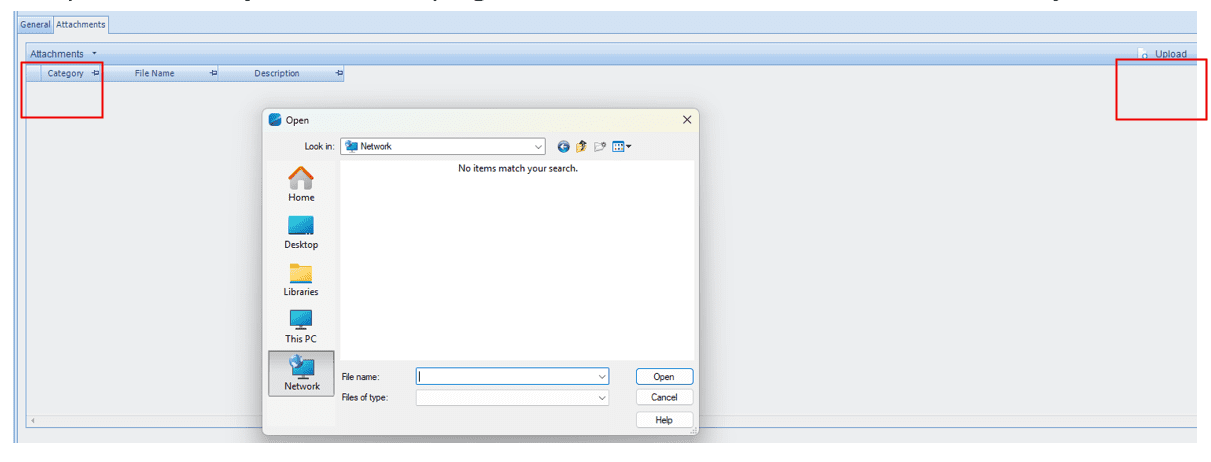
a. Go to the Attachments tab and upload supporting documentation, such as conference registration details, the agenda, three quotes for hotel accommodations, and three quotes for travel expenses.
b. To upload, click Upload in the top right corner of the Attachments tab and select your files.
- Return to the General tab and click Submit.
a. Clicking Submit will send the request to the Purchase Order module and automatically notify the Supervisor by email. - Supervisor approval.
a. Supervisors will receive an email notification from Deltek.
b. Log into Deltek, navigate to the Purchase Order module.
c. Click on the folder icon at the top right next to the search bar. Select PO Requests for Supervisor Review.
d. To review the details of the travel request, click on the link in the “Prior Approval for Travel” field.
e. To review the backup documentation, open the Attachments tab and click View in the top-right corner.
f. If everything looks correct, click on the Approve button at the bottom of the screen.
If you have questions or need help, please reach out to a member of the Finance Team.
How to Submit a Purchase Order
- Start a New Purchase Order
a. Open Deltek Vision and sign in with your credentials
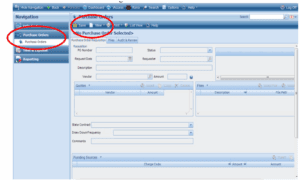
b. From the Navigation Bar, select “Purchase Order” and then click “New.”
- Complete the Required Fields
Description – Provide a short summary of the purchase or expense (10 words or fewer).
Memo – Explain the need for this purchase or expense.
Vendor – Enter the vendor name (who the payment should go to).
Amount – Enter the total amount.
Quotes – Click insert and list quotes (vendor & amount), if applicable.
State Contract – Indicate if the purchase is under a state contract by selecting the contract.
Draw Down Frequency – If the purchase will be invoiced in increments, specify the billing schedule. - Upload Attachments
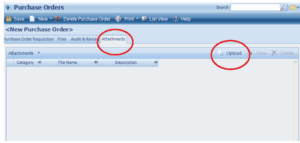
Go to the Attachments tab.
Click Upload (top right) to add quotes and/or other supporting documents.
In the category column, identify the attachment as a quote.
- Save and Submit
Click Save (top left).
Then click Submit (bottom of the page).
Once the purchase order is approved, you will receive an email notification confirming it is authorized for purchase.
If you don’t see the intended vendor or state contract in Deltek, please notify the Finance team at [email protected] so that it can be set up.
Submit a Timesheet
Our agency uses Deltek Vision, the financial management system, to process weekly timesheets. Generally, all timesheets should be submitted and approved by 4:00 p.m. on Thursdays.
Admin Overhead Charge Codes and Descriptions
For a detailed description of overhead charge codes, click here.
If You Are Unable to Prepare Your Timesheet
If you are unexpectedly absent and cannot prepare your own timesheet by 9:00 AM Friday, you should get your hours to your manager. Your manager will prepare and submit your timesheet. If the manager is unavailable, please inform a member of the Finance group at [email protected].
Field Staff
If you are a field staff member, your supervisor will fill out your timesheet every week. The number of hours entered will be those listed on the schedule agreed upon the previous week. For this reason, should any assignment run longer or shorter than planned, or if it doesn’t happen as scheduled, please let the supervisor know that immediately. This is so that the changes can be reflected in the week’s timesheet which is submitted on Thursday afternoon.
Submitting Timesheets
Open Internet Explorer or Microsoft Edge. As of June 2024, Deltek software works ONLY in Internet Explorer or Microsoft Edge.
Enter https://deltek.mapc.org/visionclient
Click on “Click here to continue…” link
If this is your first time using Deltek, enter your user ID: first initial, last name (system will automatically make it all Caps). Leave Password Blank.
You will be prompted to change your password on your first login. If this is not your first time, your username should appear, and you will only have to enter your password.
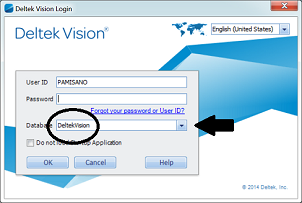
Make sure that DeltekVision appears in the Database field. If it does not, select it from the drop-down menu. Click ok.
On the left side, there is a Navigation menu. Click on the Time & Expense Tab.
Note: Your screen may look different from those used in the screenshots.
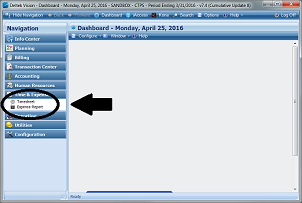
Click on Timesheet.
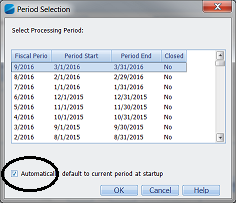
Choose the current processing period.
Check the box that says “Automatically default to the current period at startup.”
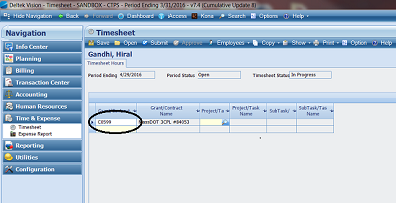
Click on the Grant/Contract cell and type in the funding source for the project. Example: “1518” or “3CPL.” For sick time, vacation time, or discretionary, just type in “Sick,” “Vac,” or “Disc.”
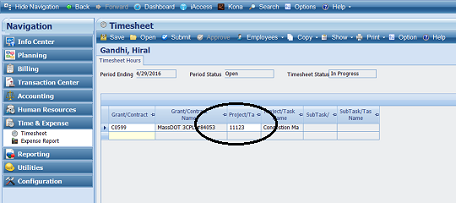
In the Project/Task cell, type in project number or name. Example: 11123
Enter the hours worked in the cells below the days and dates. Repeat steps 11-13 for each grant/project you are charging.
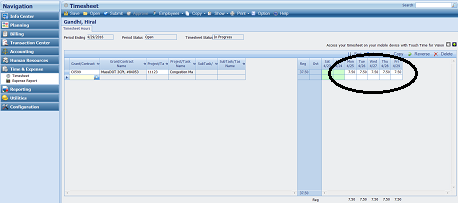
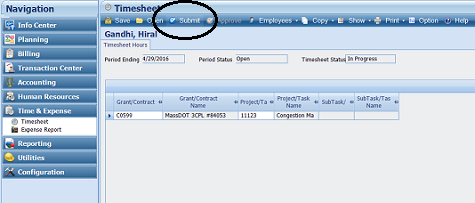
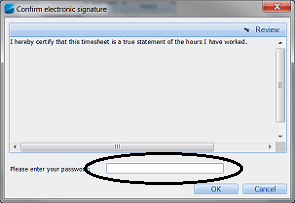
After entering your hours, click the submit button, enter your password, and press OK. Your timesheet will then be submitted to your manager for approval.
Run a Report in Deltek Vision (PDF)
Download the presentation, Deltek Vision: Report Training (PDF), for instructions on how to run a report. Remember that Deltek only works on Internet Explorer at this time.
Submit a Hybrid Work Agreement
To submit a hybrid work agreement, follow the instructions below. A downloadable PDF is available at the end of the page. All aspects of submitting agreements take place through Deltek. In Deltek, hybrid work agreements are viewable under “CTPS Forms.”
For a refresher on hybrid work guidelines, read the full text in the “General Policies” section.
Instructions:
1. Log into Deltek Vision in Microsoft Edge or Internet Explorer.
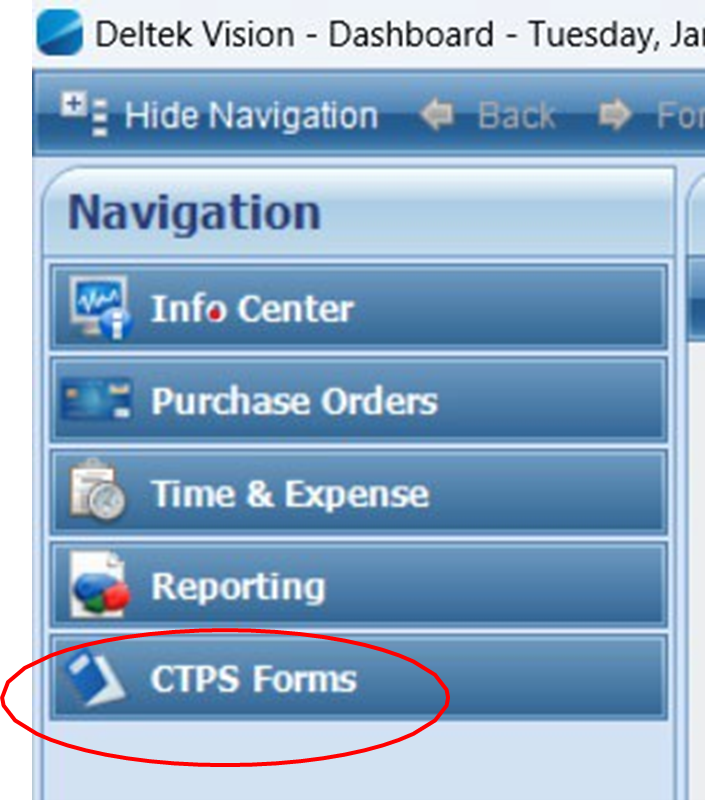
2. On the left Navigation panel, click CTPS Forms.
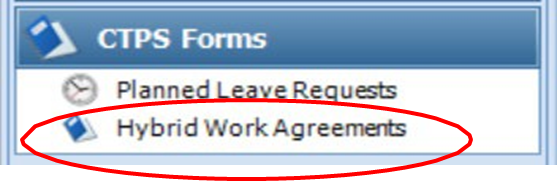
3. Under CTPS Forms, click Hybrid Work Agreements.
4. On the Hybrid Work Agreements page, click New, and select New Hybrid Work Agreement. If you want to review your active agreement, click on the folder next to the search bar on the top left corner and then click on “My Schedules.”
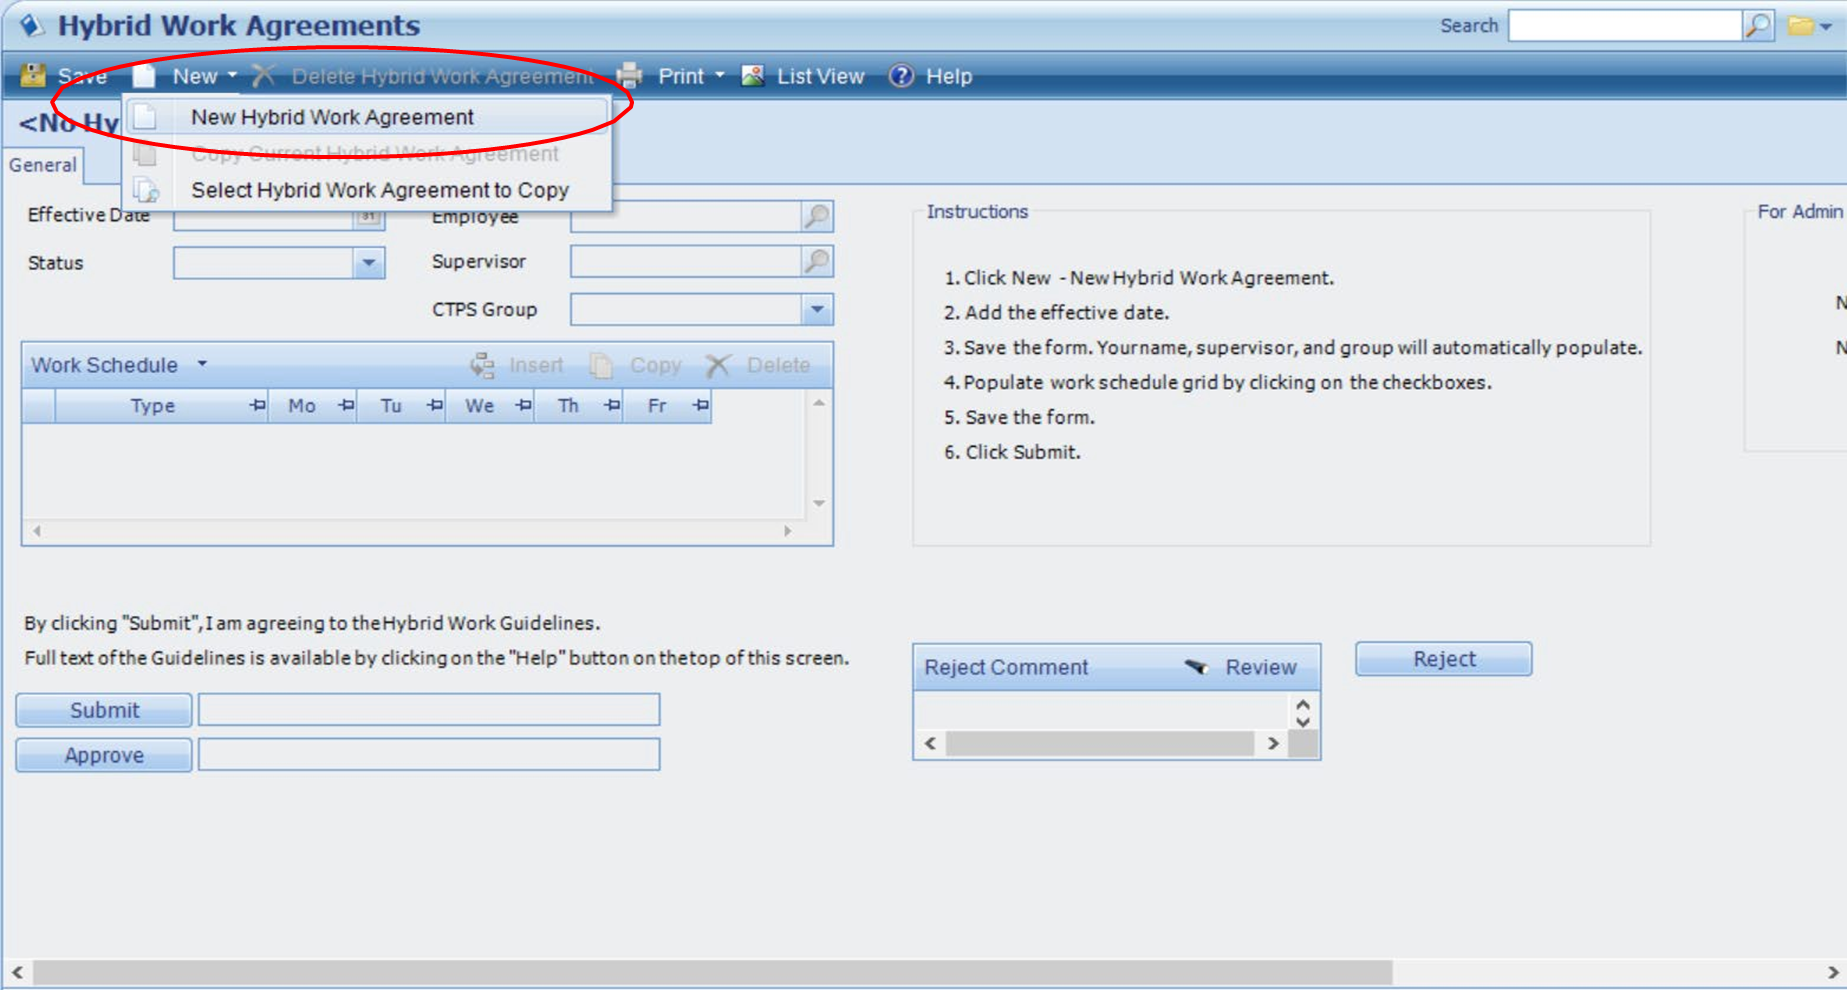
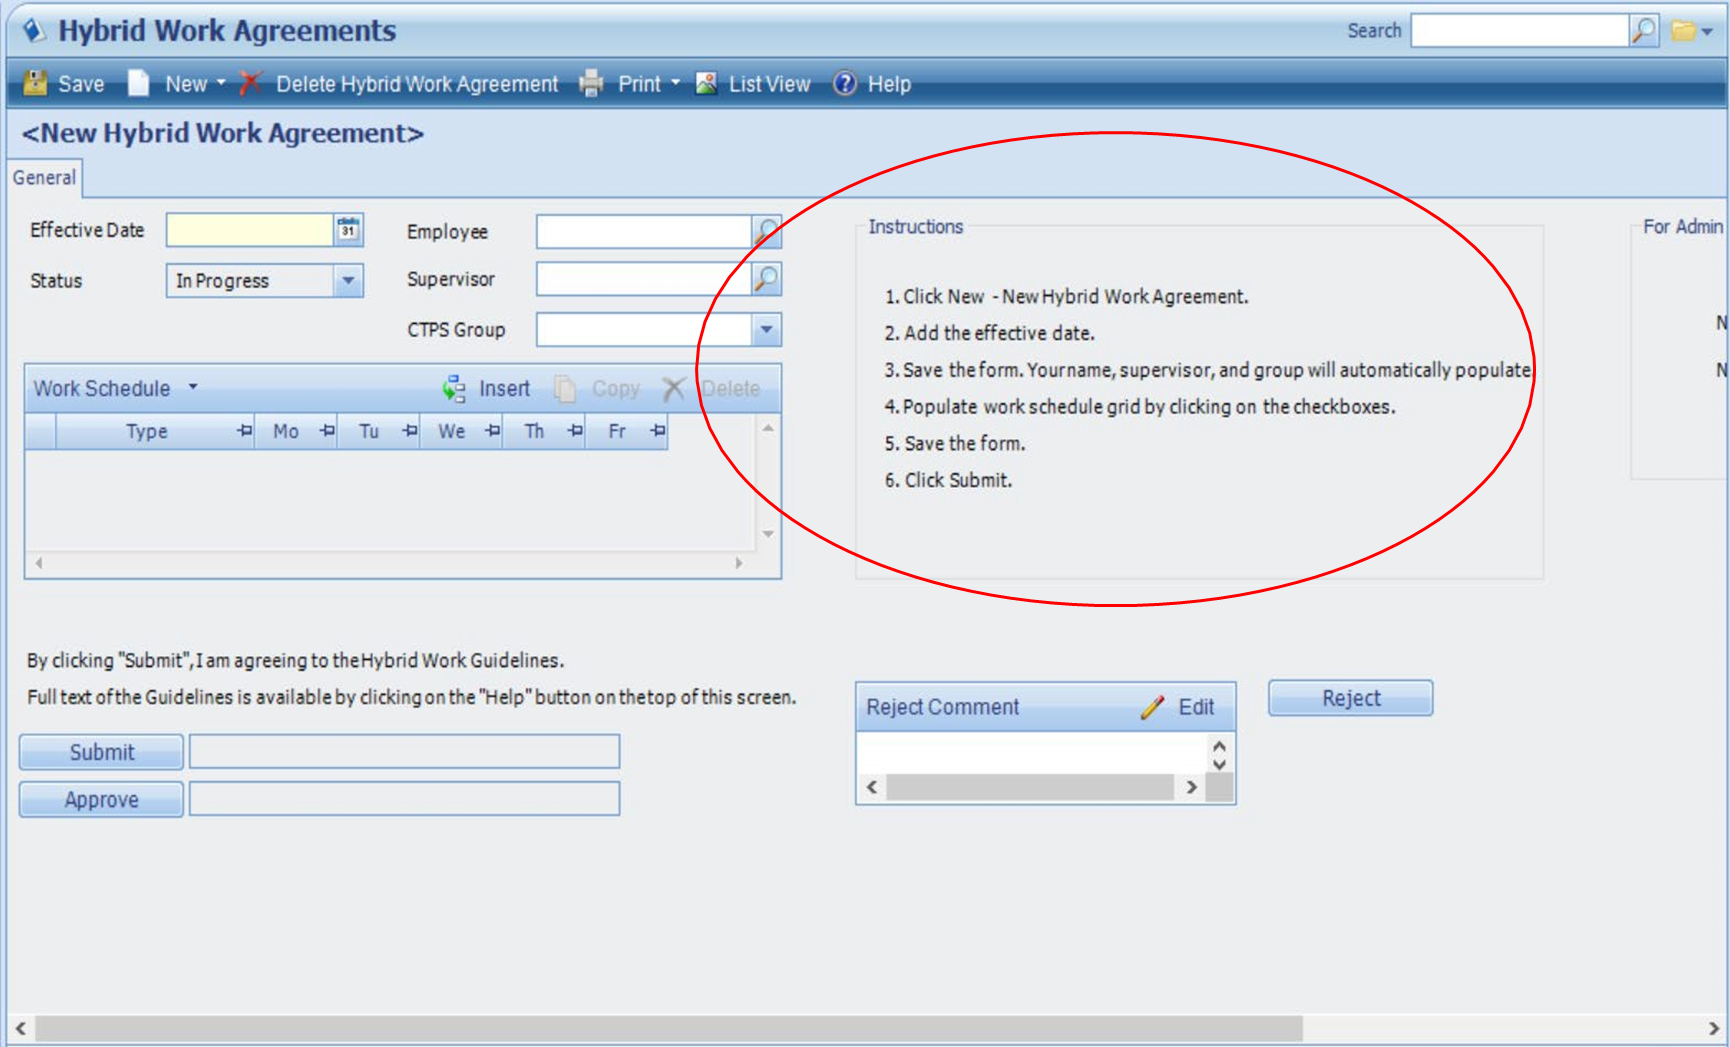
5. Follow the instructions shown.
Request a Vacation Day
To request vacation time, you must complete a leave request in Deltek. Reminder: Deltek will only open in Internet Explorer or Edge.
Below is a link to an instructional video on how to fill out the Planned Leave Requests form in Deltek. The Deltek Planned Leave Requests form takes the place of the old Leave Request Form.
Deltek Vacation Leave Request Instructional Video
(Video does not play back well within LogMeIn connections. For best performance, copy and paste this video URL into a browser running on your local computer: https://www.youtube.com/watch?v=1gXT4_LNndE&feature=youtu.be)
When to Submit the Vacation Request Form
You should submit a leave request to your group manager as far in advance of your vacation as possible. The minimum amount of notice required depends on circumstances.
Use of one day or less: You do not need an approval for one day or less. However, you need to notify your group manager and update your Google calendar. If vacation leave is used in the middle or at the end of a business day, you must inform your manager before you leave and update your Google calendar.
Use of more than one successive day: You must submit a Planned Leave Request form in Deltek at least two business days prior to your first requested vacation day. Instructions for submitting a Planned Leave Requests form can be found on the Intranet and by clicking here. (Video does not play back well within LogMeIn connections. For best performance, copy and paste this video URL into a browser running on your local computer: https://www.youtube.com/watch?v=1gXT4_LNndE&feature=youtu.be)
Use in circumstances in which discretionary or sick time is ordinarily used: It is possible for circumstances to arise in which you must use vacation time to cover an unexpected absence. When vacation time is used for that purpose, the requirement to submit a Planned Leave Requests form is waived. However, you should inform your manager and update your Google calendar as you would typically do when using discretionary or sick time.
Watch an instructional video on how to submit the form through Deltek. ( Video does not play back well within LogMeIn connections. For best performance, copy and paste this video URL into a browser running on your local computer: https://www.youtube.com/watch?v=1gXT4_LNndE&feature=youtu.be)
Vacation, Discretionary, or Sick Time Advances
Advances of vacation, discretionary, or sick time are not given. You must use discretionary time or vacation time if you become ill and do not have enough sick time to cover your absence. You must take administrative leave without pay if you do not have enough discretionary or vacation time to cover the absence. This policy applies regardless of the proximity of the day when additional leave time will be accrued. For example, if you become ill on a Monday that happens to be the last day of a month, you may not use sick time accrued on Tuesday to cover Monday’s absence.
Check Leave Time and Accruals Usage
Check Leave Time and Accurals Usage
Use the guide to check your leave balances in Deltek. There are two ways that you can view your leave time accruals and usage. As of January 2018, Deltek software ONLY works in Internet Explorer.
Click here to download and print a PDF of these instructions.
View leave time in Time and Expense module
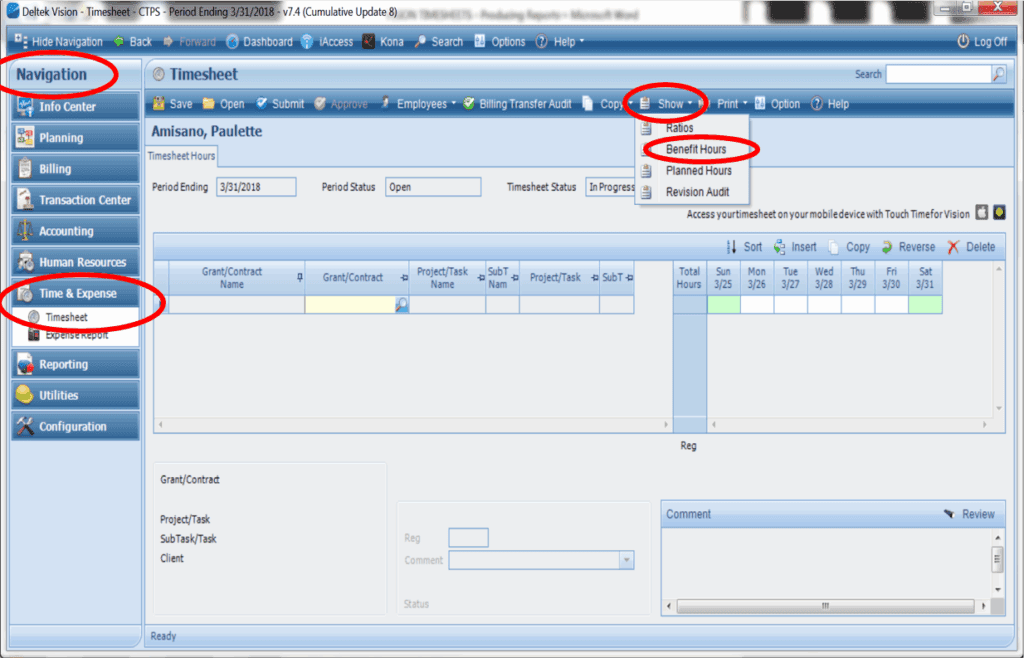
- Under Navigation, click on the Time & Expense module.
- Click on Timesheet and your current week’s timesheet will open.
- Click on “Show” Tab in the menu bar.
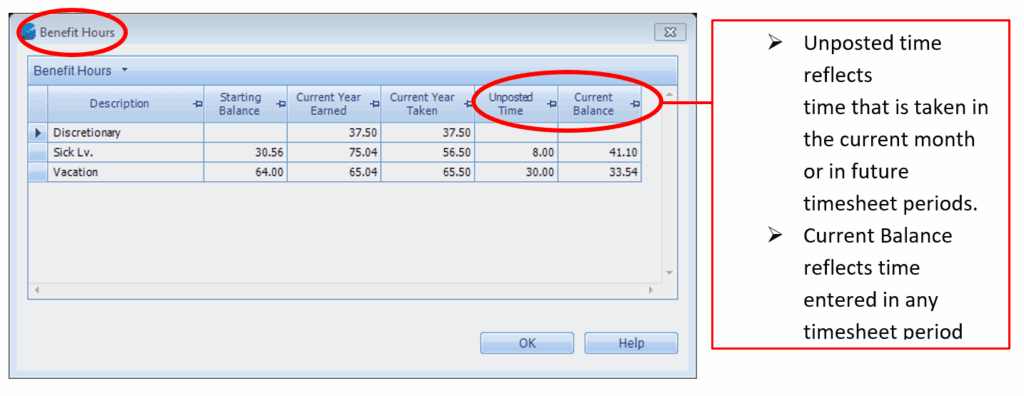
- Click on “Benefit Hours” and the report generated will report your current balances.
Hours reflected include hours entered in any timesheet period; past, present, and future.
View leave time in the Reporting module
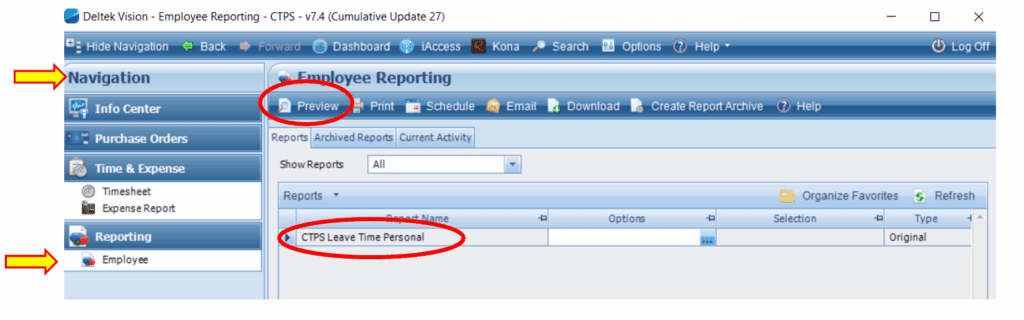
- Under Navigation, click on the Reporting module.
- Click on Employee.
- Only 1 Report will be available “CTPS Leave Time Personal”.
- Click on Preview in the menu bar at the top and the report will generate.
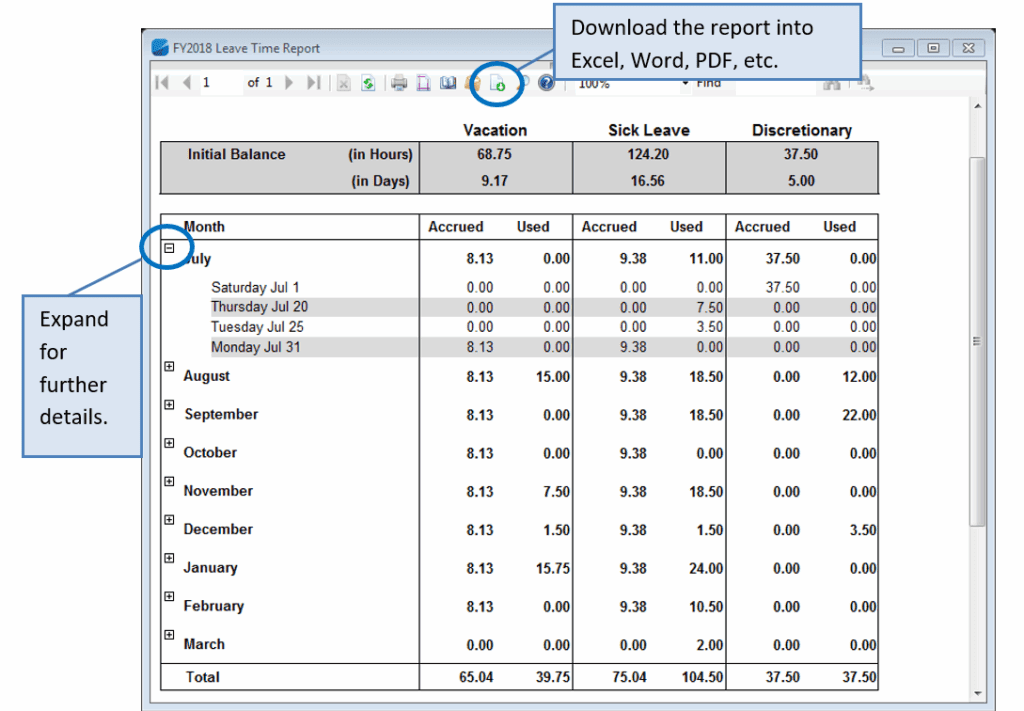
- This report lists the current fiscal year accruals and usage by category (sick, vacation, and discretionary).
- This report can be printed or downloaded into pdf, excel, or other formats.
- In the report, clicking on the + will expand and provide further details.
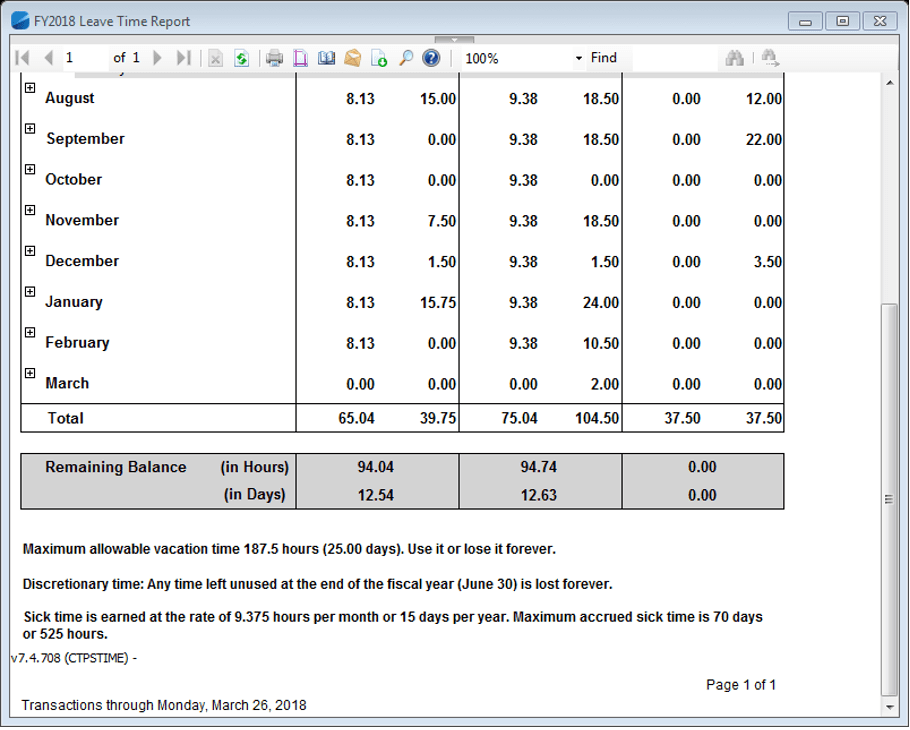
- Remaining balances and accumulation limits are shown at the bottom of the report.
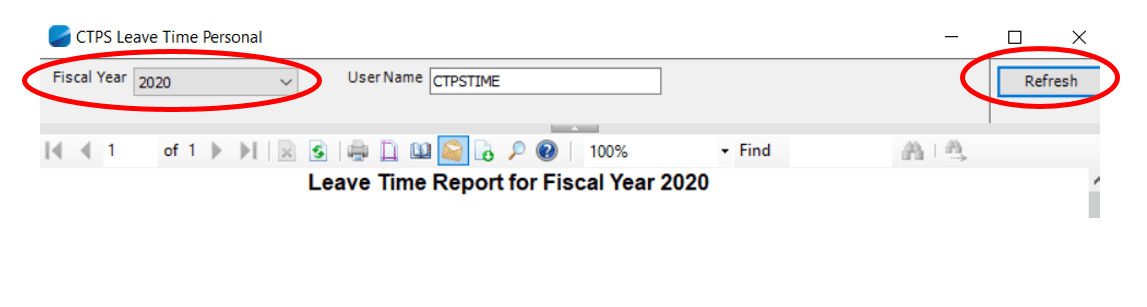
To view prior years, click on the small arrow at the top of the report.
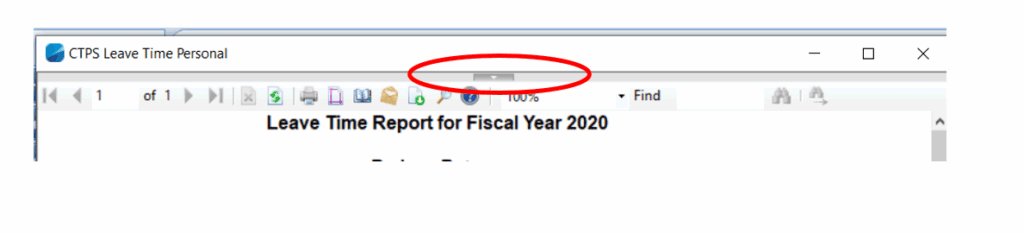
Click on Refresh, and the new report will be generated.